Stretching quads is hugely underrated. If you’re a runner, if you work a lot or if you sit down all day, your quads are just tied, especially around the hip flexor area. We often do a lot of stretching on the muscles of our posterior chain. Those are the muscles that seem to get spread all the time. What do we do, we seem to neglect the chest the hip flexors the quadriceps. Today we’re going to focus on how to stretch the quads.
Why Stretching Your Quad Muscles Is Important?
- Why Stretching Your Quad Muscles Is Important?
- 20 Most Effective Quad Stretches to Reduce Pain During and After Workout
- Bridge
- Thunderbolt – The Diamond Pose
- Reclining Hero Pose
- Low Lunge (Crescent)
- Low Lunge with Quad Stretch Pose (The Kneeling Quad Stretch)
- Standing Quad Stretch
- Side Lying Quadriceps Stretch
- Prone Quadriceps Stretch
- Prone Straight Leg Raises (Lift Alternated)
- The Kneeling Quad Stretch
- Lying Pigeon Progression
- Ground stretch (Reclined Knee to Chest)
- Pigeon Pose with a Twist
- Frog Pose
- Rear Foot Elevated Quad Stretch
- Quad Foam Roll
- Camel Pose
- Straight Leg Raises
- Hamstring Curls
- Wall Squats
Stretching out your quads in the front of your hips and hip flexors are a great way to reduce tension and stress. We carry a lot of stress in our hips and bring a lot of muscle tension there. When we release them out, it often helps to keep that area a gentle. It is a great way to manage your mental health, as well.
Before we even begin, let’s take a look at the anatomy. So there are four muscles that make up the quadriceps. We have the Rectus Femoris, the Vastus Lateralis, the Vastus Medialis, and the Vastus Intermedius. Now the Rectus Femoris is the only one of the four quadricep muscles that cross the hip joint as it originated off the ileum. So, therefore, the Rectus Femoris is the only quadriceps muscle that assists with hip flexion all four primary functions is to perform knee extension.
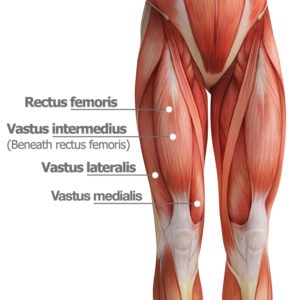
Now all four quadriceps muscles come down, and they form into what’s known as the quadriceps tendon. And then the quadriceps tendon becomes the patellar tendon, which attaches to the tibial tuberosity. We need to train and work on all of those movements in the extension or knee flexion to get flexible quads.
20 Most Effective Quad Stretches to Reduce Pain During and After Workout
Here are 20 techniques to help you get the flexible quad. Just like any muscle of the body, we never want to stretch it cold. Make sure it’s warmed up. We’re going to stretch after warm-up, after we walk a little, run a few, do some dynamic warm-ups. The best time to stretch a lot of times is after your workout. Never do your stretching first thing in the morning. It’s a good idea to do some rolling before. Get that blood flowing in there before you do these stretches.
Bridge
Many people enjoy a bridge pose. There are a lot of benefits of this pose. The first part is that it strengthens the backline of the body, glutes, and hamstrings. Most of us need a little more work in that area. It strengthens the back of the spine and shoulders. Opens up chest, and opens up the front of hips. It is a no-brainer that it’s pretty cool to help with posture, breathing, and just overall mobility and wellbeing.
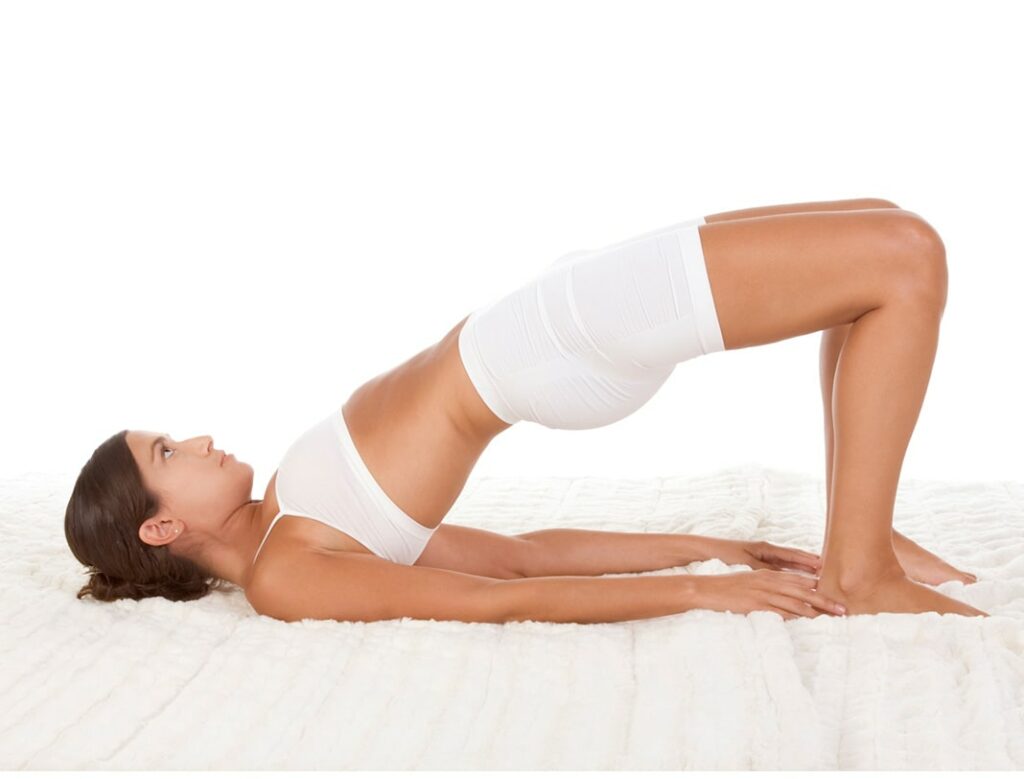
Lay on your back and set your feet up the hip distance about sitting bone distance apart. Try to line your ankles underneath your knees. A general guideline can be if your arms are down by your side that your middle finger grazes the back of your heel. It varies from person to person, so you try it on. If your knees hurt, that might mean you need to shift your feet a little bit. Change it up a bit. Bend your elbows. Press the backs of your arms into the floor. Look straight up at the ceiling. Press the back of your head gently into the floor.
Now when you press the back of your arms, you can slide your shoulder blades under you a little bit more and feel your sternum. Your breastbone lifts up a bit. Now push your feet evenly and keep your big toe mounds rooted down. Push your feet to lift your pelvis and your spine. Keep your head steady and looking straight ahead. Press the backs of your arms a little more. Wrap your shoulder blades under you. And then release your hands to the floor if you’d like, or keep your arms. Right now, you feel the work in your glutes and hamstrings. If you want a little extra fire and a few additional actions, you can try dragging your heels in toward the backside. Then that will light up your hamstrings a bit more. Draw the tailbone toward knees and lift the hips higher. Press the backs of the arms. You can feel that you are quivering. Shaking’s a good thing. It means you are building new neural-muscular connections. You are going lower down, one vertebrae at a time. That’s bridge.
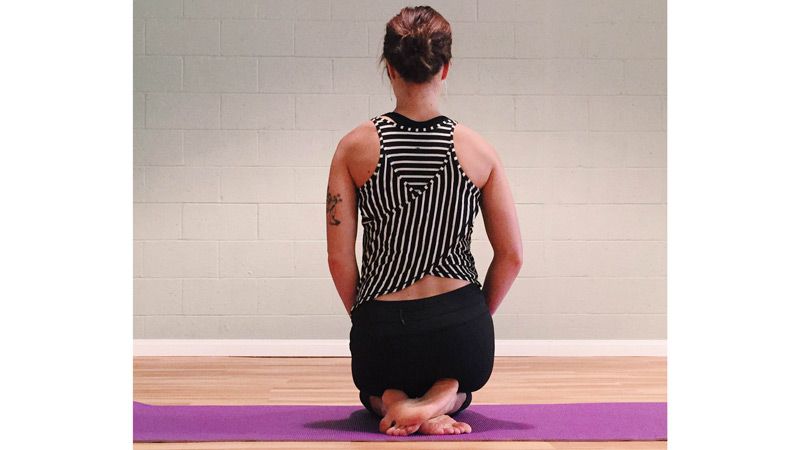
Thunderbolt – The Diamond Pose
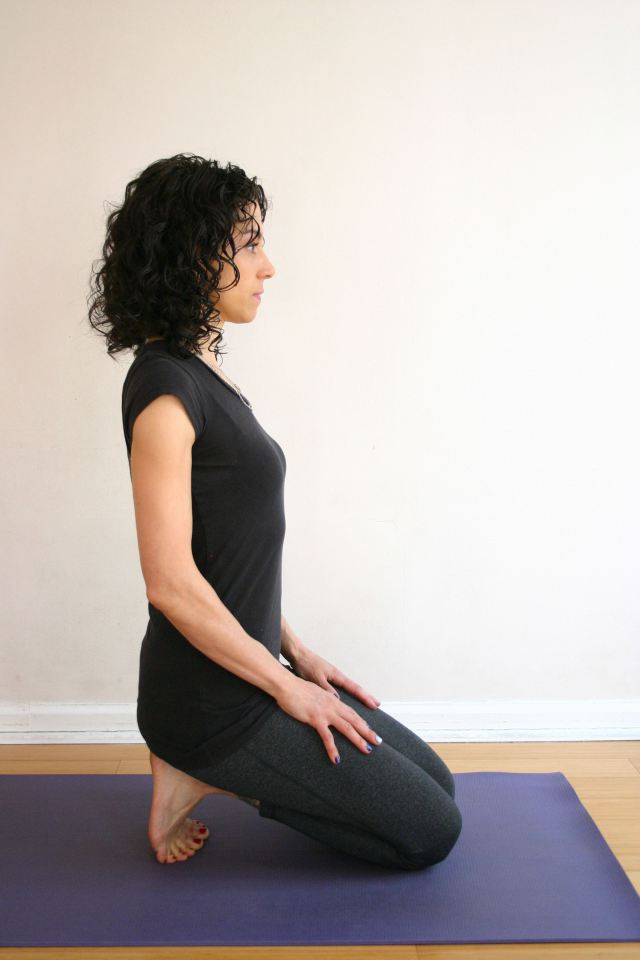
Come on all fours, relax the toes. Slowly bring your weight into, or rather onto the heels. Press the palms down, settle in, bring your body weight into the heels. Palms facing up if you wish, that’s your personal choice. And settle in here. You can use your phone to practice. Lift the phone up to eye level that you have a fantastic extension here in the neck. You lengthen the back of the neck and not start to slouch.
The variation of Thunderbolt Pose
You curl the toes onto the mat. Bring the weight into the heels. Settle in. Palms are facing down or up. At this point, your toes get a fantastic stretch. Release the breath into the toes. Connect with the breath, let your forehead soften and spread. Enjoy the stretch in the toes.
Let’s get to another variation. We overlap the toes in this case. The right foot is under the left. And this way, the left ankle gets a beautiful stretch. Obviously, the more you overlap, the more you stretch the ankle. You can turn the palms up. Let’s change to the other side. So, in this case, the left is under the right. Your right ankle gets a beautiful stretch. Palms are facing up or down. On top of that, your foot reflexology points get a fantastic massage. It is a lovely exercise, very calming and soothing.
Vajrasana (Thunderbolt Pose) vs Virasana (Hero Pose)
There is a misconception you may found, Vajrayana is very different from Virasana, which is the hero pose. In the hero pose, you would have to move the knees further out probably, and then you can sit in between the heels. The heels are out the toes twisting in. And you sit in between the legs.
Now, there is a lot of compression in your ankles, in your hips, in the knees. I suggest, especially if you are not warmed up to use a small pillow or a blanket, any type of cushioning here. And sit like this. You release the weight into this position, palms facing up or down. So the main difference between the two asanas is:
Thunderbolt pose (Vajrasana) — you sit on the heels of the feet. Hero Pose (Virasana)– you sit in between the feet.
Reclining Hero Pose
Bring the heels to the outside of the hips. It would be your first variation (seated position), which is actually not reclining, but you’ve got to check in with yourself here to make sure that your knees are okay with this pose. If your knees are stressed, then you need to get a blanket, fold it up and sit on top of it so that you’re putting a little less of an angle in the knees.
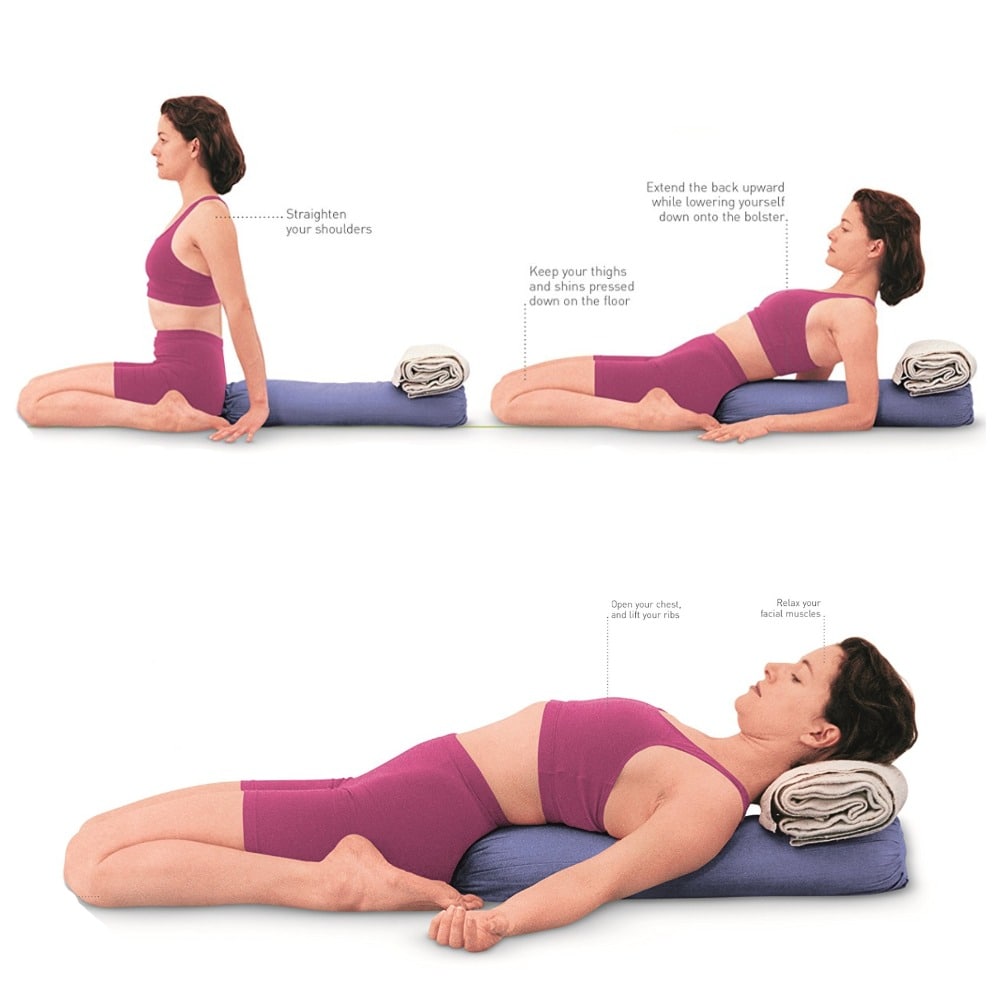
If you’re comfortable here, you can begin to lie back. First, come onto your elbows, checking in with your knees. If your knees are stressed, get a blanket or a bolster. Put it underneath your butt. Raise your butt up so that you’ve got a little less of an angle in the knees, can’t stress that enough. If you’re comfortable here, you can come all the way down to the floor in reclining hero pose. Press down into your feet and your knees and press up with your hips once again. It’s how you’re strengthening all of these structures rather than just focusing on stretching. You can use blocks here or bolster to lie back on initially.
It’s going to open you up through the quads through the front of the hips. Let the hands fall open, let the eyes close, let your shoulder blades fall into the floor, and inhale and exhale through the nose. Keep the breath long and strong. Stay here for 5 to 20 breaths. If you feel that you’re comfortable beyond that, you can stay here for up to 3 minutes. When you’re ready to come out of this pose, I find the best way is to use my elbows and slowly, slowly bring myself back up to a seated position.
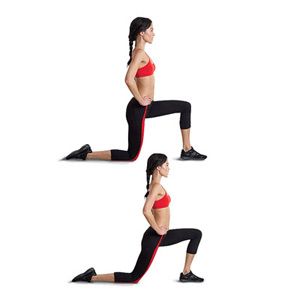
Low Lunge (Crescent)
Take your right leg forward. Reach your arms up to the sky and feel the pose. You’re passively opening up the left hip. You’re gently peeling open the right hamstrings. And take a long breath in here. And then see if you can sink down a little bit deeper.
The first option, you’ll take your right hand to your left wrist. Take a long breath in and then drag your hand over to the right. Then there’s a tendency to lean everything into the right side body. You want to lean more into the left, engaging the inseam of your right leg and activating your quads. Take a long breath. And a full exhale out. See if you can reach your right ribs forward a little bit more. They tend to want to go backward. You want to open them up. And as you lean over to the right. Take another big breath. And a full exhale out. Reach your arms back up, and then release your hands down.
Back-Bending Variation
The second variation is with a block. You don’t have to do it with only a yoga block. You can use any object in your house. It doesn’t have to be a $75 block that you get just for your yoga. You can do it with books, with a chair or a stool.
Take your block in line with your hips and take your right hand onto your block. You must press down into your block. Let your fingers be kind of passive as you press the meaty part of your palm down. The more you could press that down, it goes really into the chest. The more that you can press down into your palms, the more you can open up your chest. Then reach your left arm up and over. Again, leaning your body towards the left, checking out your front knee, making sure it’s pulling you forward over your second and third toe.
Soften your shoulders, take a long breath. Your eye gaze starts to look up. Inhale. Exhale. Now, imagine that your breathing is like an upside-down. Inhale through the nose and feel the breath going into the left ribs. Then as you exhale, feel the breath going towards the right ribs. Lift back up and out of your nose. Inhale into the left rib, exhale out of the right. Lift back up. Arms reach high. Release your hands down, taking the time to sit for a moment. Acknowledge where in the body you felt that and how each side was intrinsically different from the other. The more that you can connect in and notice what parts of your body are reacting or speaking to you, then the less likely to cause injury and the more fulfillment you can find in your breath.
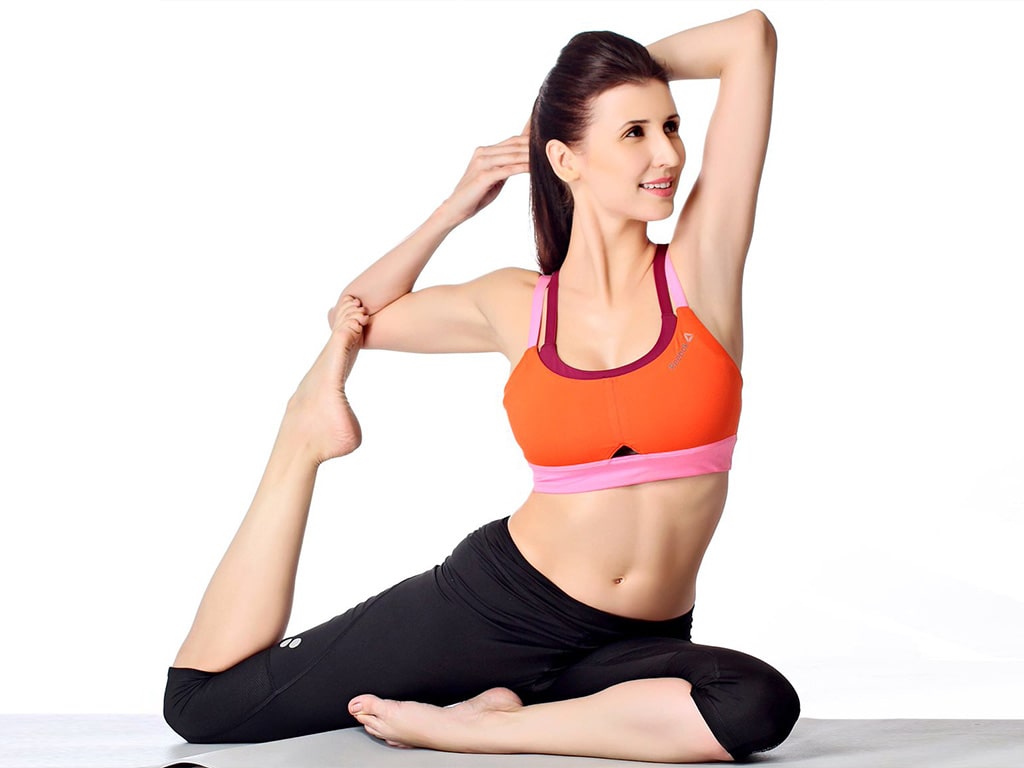
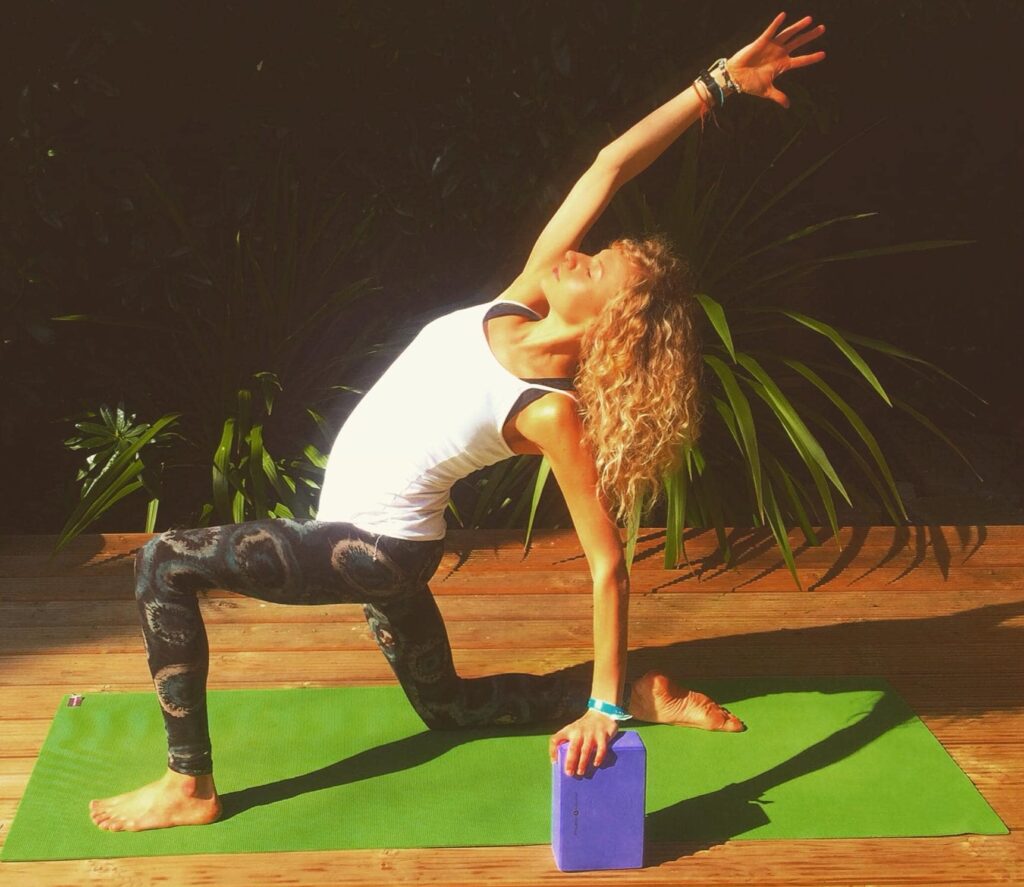
Low Lunge with Quad Stretch Pose (The Kneeling Quad Stretch)
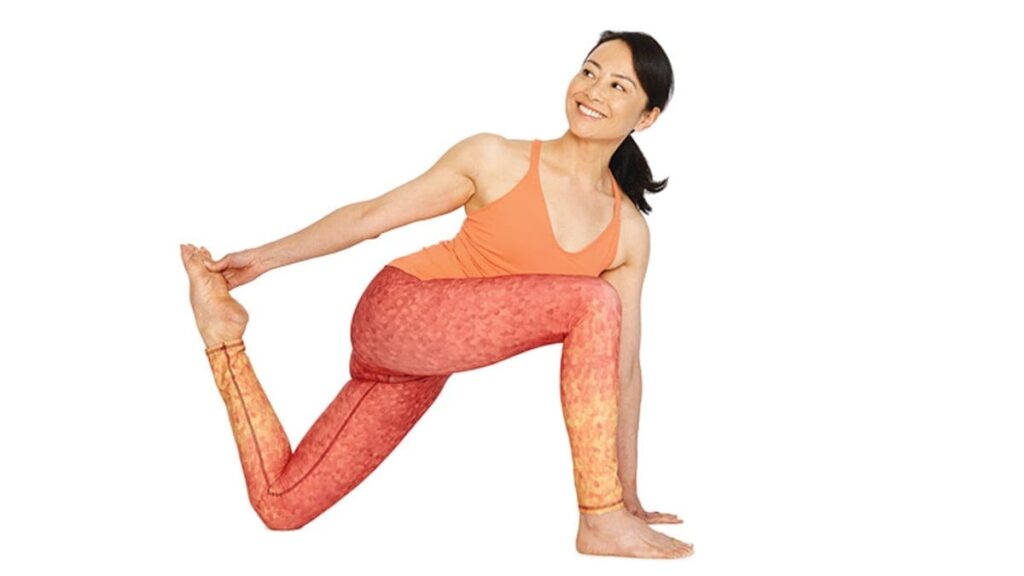
Come through your hands and knees. Then bring your right leg forward. You can bring the right knee directly above the right ankle if the back knee is down. So once your legs are settled. Your back leg, knees, and the top of your left foot are on the ground. You’re looking down. Keep as much length in your spine as possible. Press the hips down towards the floor. You’re getting the quad stretch on the back leg. So the left leg here is stretching the front hip area of the hip socket and the quadriceps muscle. You should start to feel a deep stretch here. Bent the left leg and hold on to the foot with your right hand. You’re coming into somewhat of a twist. You may need to adjust this left hand on the floor. It gives you some leverage to open your shoulders to be able to reach that foot. Once you’re holding the foot, you can press the hips down once again. Feel a little bit of a deeper stretch in that area. It’s quite challenging. Especially if you are tight in this area. You can always keep this foot down, and that would definitely stretch the quad as well.
Standing Quad Stretch
You can do this exercise anywhere. You don’t have to hold on to anything, but it’s best to hold on because then you can focus on your stretches just a little bit more. It’s going to be 30 seconds stretches three on each side with a 10-second rest break in between.
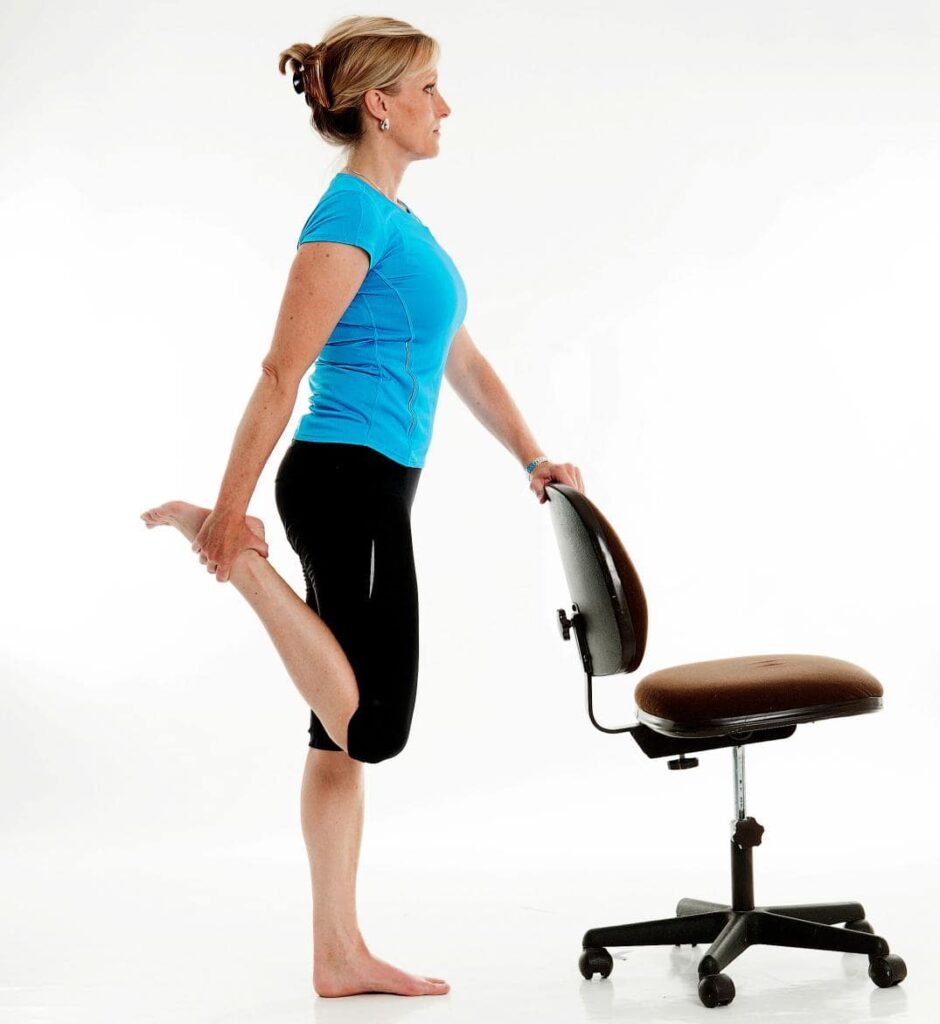
Grab your foot and make sure the top part of your leg is straight down. The important part of the stretch is that the quad is down. The closer you can get your heel to your bottom, the better stretch you’re going to get. You have to pull it back. Just pull it until you feel a little stretch in there. Take that short break in between. If your thigh is coming forward, then you’re no longer stretching your quad. You want to focus on that. Also, the most important thing is not to lean forward because you’re taking away from that stretch. That is why keep your upper body nice and upright and pull backward. You don’t have to pull up high. You can only go until you feel a comfortable stretch.
You can also add in a little bit more pushing back to get the hip flexors as well if you want too. When you are stretching here, you pulled that knee back. You’re going to get those hip flexors stretching a little bit as well.
That’s a great area to stretch out if you’re sitting a lot throughout the day. Because those muscles are in a shortened position, it’s the best way to stretch it out. It’s pretty easy to do, primarily if you work at a desk, and you don’t get to move a lot because you can stand up at your desk. It’s an excellent way to keep those muscles moving, especially if you don’t get to move your legs throughout the day.
Stretching out your legs is a great way to prevent blood clots or DVT or anything like that. When you do the quad stretch, you should feel it in your quad muscle. Some people feel it in their knee, that could be because that joint is tight as well. If you’re feeling it more in your knee versus in that quad muscle belly area, maybe you can’t go as high. Try to bring that leg back a little bit, and that will should help because it’s all connected. If it’s tight through here, sometimes your knee is going to be very tight as well, If you feel pain in your knee when you’re stretching, then go ahead and hold off, because there might be something else going on. It shouldn’t be painful. You feel tension with the stretch out. You should check in with your doctor or your physical therapist because it might not be just tight muscles.
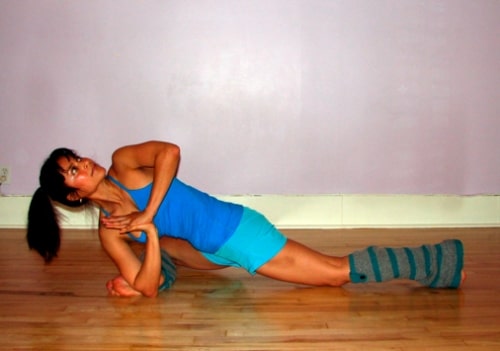
Side Lying Quadriceps Stretch
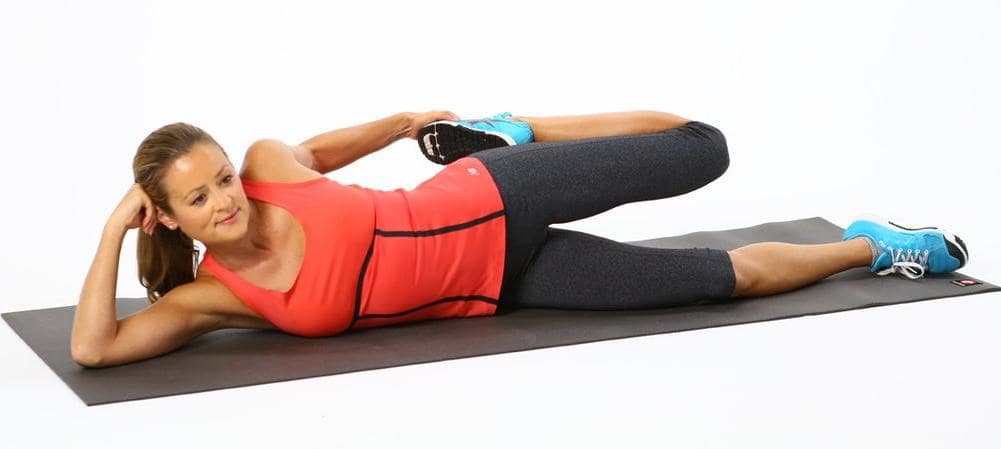
Get into a side-lying position. Your arm stabilizes your body from rolling forward to back. Go ahead and keep the bottom leg bent. Grab the ankle and pull it towards the glute. Bring this knee back. Make sure your pelvis isn’t moving. Again. Go ahead and bring the pubic bone up towards the belly button. That action will fixate the pelvis, or it will pull the pelvis introduction that will end up, giving you an increased quad stretch. Pull that bone up, the ankle, the glute, the knee back. You’re getting a pretty good quad stretch right there on that left side. You will feel a little bit of tightness in the front part of the thigh. Hold these stretches ten to fifteen seconds per leg, gradually improving working your way up to thirty seconds. It will improve the flexibility of the upper part, the quadriceps of the leg. Adding this as part of your daily routine will help minimize the chance of injury and impact, especially the stretches of the knee. Side quadricep muscles cause pull in the knee joint itself. The more flexible your quadriceps are, the more range of motion you’re going to have through the knee with good stability and strength.
Prone Quadriceps Stretch
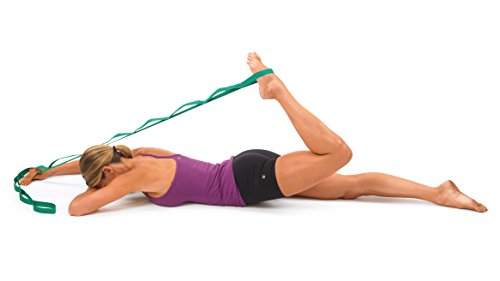
This stretch is performed lying face down. Turn over onto your stomach. Take your belt and make a little loop in it. Attach one end of the belt to the foot and ankle. Tight it up. Bring it around your shoulder; this is the key. Pull-on that strap until you feel a good stretch on the front thigh part of your leg where that quadriceps muscle is. Now, most people aren’t going to be able to touch their bottom like this. That’s fine. You want that stretch to be a good tension. You want the pressure. Remember, you don’t want it to be painful. This stretch should be felt in the anterior thigh. Hold for 30 seconds and repeat on the opposite side. This stretch can be performed up to three times at one time and up to three times a day. It helps to improve the range of motion following any procedure of the knee or following knee injury.
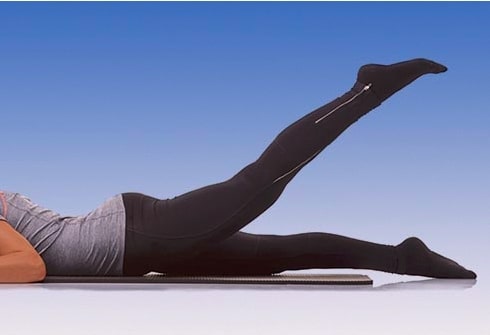
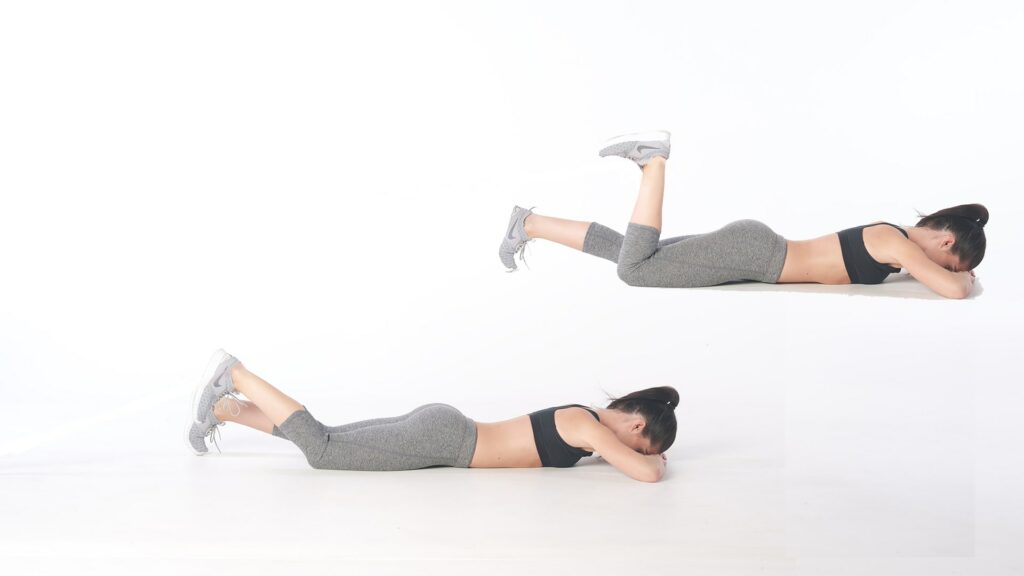
Prone Straight Leg Raises (Lift Alternated)
This exercise, you can call “on your stomach.” Lie flat on your stomach. You want to lay out as flat as you can. Make sure you keep your head down in a neutral position, so you don’t end up stressing out your neck. Straighten your knee out. Try to get a contraction of the glute muscle; try to get it engaged. Otherwise, your hamstrings are going to try to do everything. Then lift your leg. Don’t kick it super high. Just enough to raise it off the ground. Slowly come back down. And alternate sides, back and forth. Try about 10-15 of those.
If that get’s to be easy, then you can increase your repetitions and then increase your sets. If those are easy, then you can start alternating sides. We call it the swimmer cause it kind of looks like you’re swimming a little bit. So if the left arm goes up, the right leg goes up. And then you just alternate back and forth.
If it still easy for you, then you can do what we call Superman. That’s lifting everything up (legs and arms) at the same time. Try and hold it for just a little bit if you can. And then come back down. Then you can build up your time holding it up in the air. After come back down. Those were your back extension exercises in prone on your stomach.
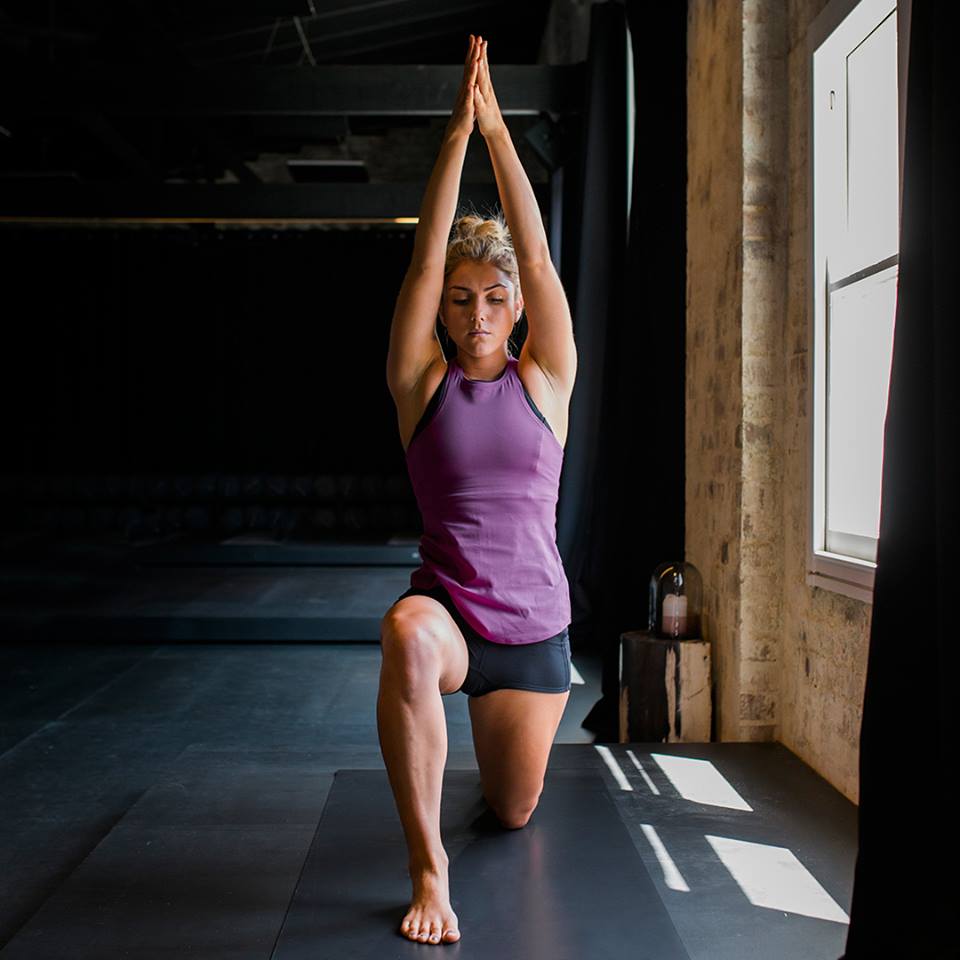
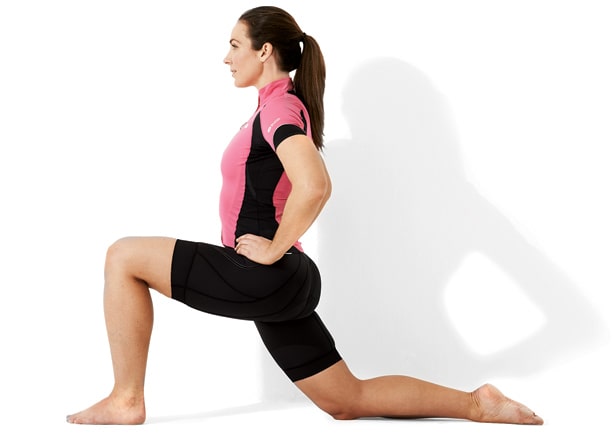
The Kneeling Quad Stretch
For this exercise, you can use a basic yoga block or a pillow. Something, just to cushion your knee a little bit. Kneel over the top of the pad and bring your right leg forward. It’s like you’re doing a softball photo or something.
Now the first and most important thing is always trying to get a sense of postural positioning. Your back foot, your first and second toe, is curled underneath you so that you can get a good base. Put most of the body into your right heel, so your front leg will carry the load. Think about lifting everything out of this left knee. So there isn’t a lot of pressure on the knee. The whole stretch will be in front of the left thigh. Squeeze your glute hard, tuck that tailbone. Hands-on the knees, and reach that heart up. Hold that for 20 seconds.
Focus on tucking and squeezing. Put a hand on your bum. If you don’t feel that tush on, try to push down a little bit harder through your first and second toe. Squeeze and hold. What you want to visualize when you’re holding this position is that your energy is reaching up. You’re not crushing down into your kneecap. You’re not trying to push down. You’re actually trying to lift up and tuck. You should feel a deep stretch. If you don’t feel it, bring the foot a little bit further forward so you can get deeper in the stretch.
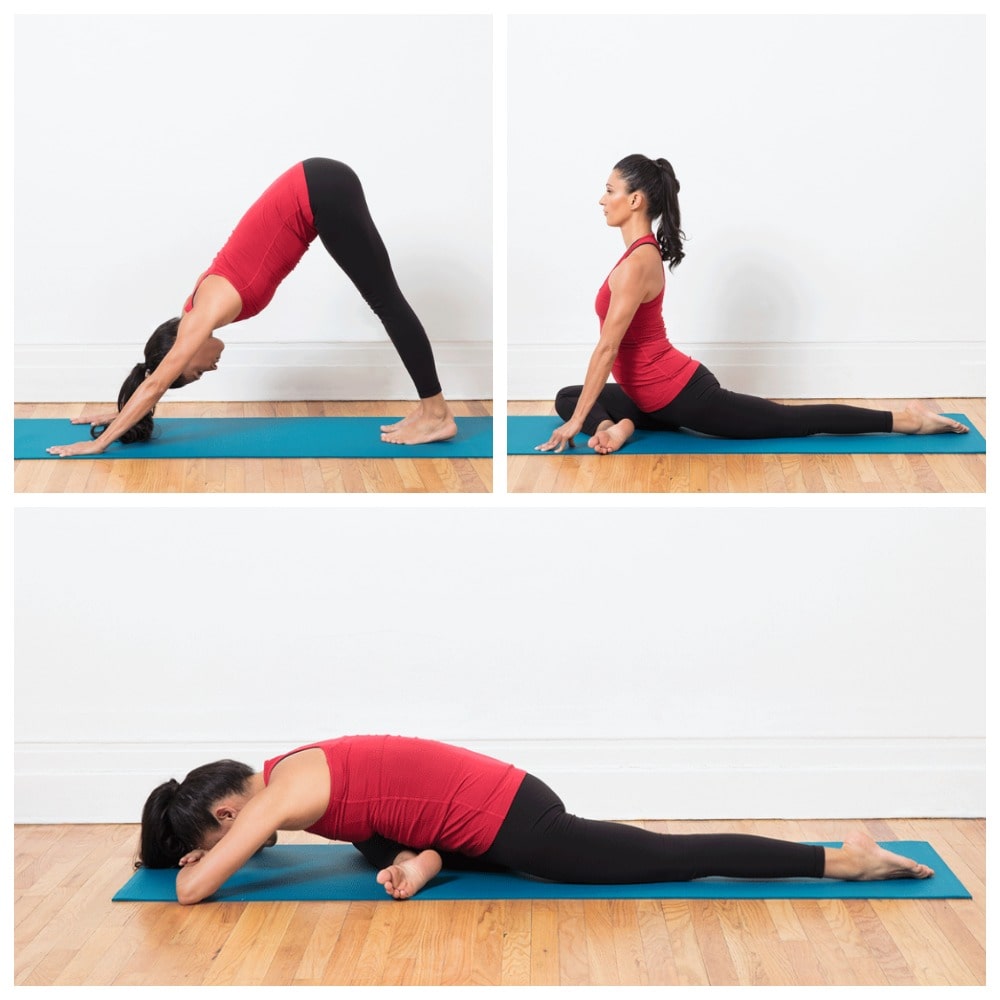
Lying Pigeon Progression
Pigeon pose is a hip opener. It’s not a knee stretch. It might touch some other parts of your body, but you really want to make it about your hips.
Start in down dog and work your way into it from there. Tuck your toes, hips up and back. Your left leg up. And you are bringing that knee behind your left wrist, walking your back directly behind. Slid that hip back as far as you could. Untuck toes, press into the top of your foot as opposed to sickling your ankle.
It’s active here. Your knee is outside of the hip. Always give the queue of trying to bring it to the outside edge of the mat because you can’t go wrong if you’re moving it out as opposed to in. After that, you should be able to prop yourself up on fingertips and stay like this. But for a lot of us, we have some space between our hips and the ground. In that case, fold up a blanket as much as you’d like. Shove that underneath your butt, and that way, you can sit on top of that.
Just one thing to note, in addition to your knee being outside of your hip, ideally, the shin would be parallel to the top edge of the mat. You’d be flexing that foot to get a deeper stretch in that left outer hip. If that’s inaccessible to you, be wherever you can be. Make sure your knee is outside of the hip.
Hips feel good and supported. Once you have that substantial base, walk your hands forward. If you’re super-flexible, you can make a pillow for your head. Rest your forehead. In that case, a block is your best friend here. Grab one, medium height, which feels good in your neck. Bring forearms on either side of the block, rest your forehead, and melt until you feel your shoulders move away from ears, onto the back.
Try to hold it for 10 breaths. And by holding it doesn’t mean scrunching your face or scrunching your shoulders. Use every breath to spread through collar bones, relax your shoulders onto the back. That was the right way to do a pigeon pose.
Common mistakes:
- Starting on the ground and not in down dog position.
- Knee in line with the hip.
- Putting weight on hip and then folding forward, which squishes your insides.
- The sickled foot.
- Spine out of alignment.
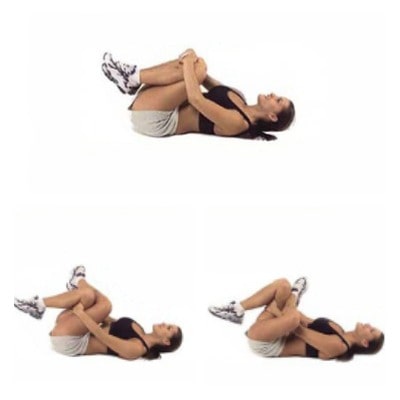
Ground stretch (Reclined Knee to Chest)
This next pose is knees to chest. People sometimes ask how can they relieve the tension or pain in the back, and this is a wonderful way to do that. It also helps to stretch glutes muscles.
Lie on the back and take and hug your knees into the chest. Keep your shoulders connected with the earth and pull your knees as you breathe. If your back is uncomfortable and if your spine feels like it’s hurting a bit, you can also take a blanket. Place it under your back. It’s good not to have too much cushion.
There are several ways you can do this stretch. You can hug the knees separately, grabbing a hand on each one. And pull them in. And try to ground down through that lower back so if your behind is pulling really far, try to let that lower back sink down into the floor.
Another nice way to stretch the back is to mix the legs in circles slowly. That’ll massage the sacrum and around the lower back. Hug the knees back in, and if this is too much to hug them this way, you can grab underneath and pull them in. It’ll give a slightly different stretch.
Another good variation of the stretch is a resembles pigeon pose. Cross a leg over. Always make sure you flex that foot. Flex the foot and bend the leg in. You’re going to reach one hand around, and one hand underneath, and clasp the hands underneath. You’ll feel a nice stretch on the turned-out leg through the side of your leg, through your back and through your piriformis muscle, which is the top part of your glutes. Pull it in, tuck the chin slightly, and breathe. Slowly bring it down. Then you’ll switch legs.
Pigeon Pose with a Twist
Start in a plank position. Hands are under the shoulders. Legs are up. Take your left leg, reach it up. Bring that knee toward the outside of the left wrist. Go ahead, keep those toes curl under of this. Lower down onto the left forearm and then the right.
You are in a pigeon pose. You’ve got a very active right leg, belly button to the spine.
Lift up, rotate the spine, left elbow lowers, and the right-hand steps. The goal is that you’re not open hips; as such, you’re going to stay down into the stretch.
Keep your head up and let your chest rotate. Stay in this position for a few seconds. Then release the hands, come down and move it back into that right.
Frog Pose
This pose is a deep hip opener. Start on your mat on your knees. One thing that a lot of people like to do is fold their mat in half to provide a little bit more cushion for their knees.
Spread your knees. Bring your knees and your ankles in line, pulling your toes back towards your shins. You want to stack your hips right over your knees. After that, if you’re able to come down to your forearms. Maybe down to your chest. Try to get as comfortable as possible here. Hold this stretch for as long as you can. One thing that you can do when you’re doing a long hold in the frog is to place a yoga block right underneath your chest.
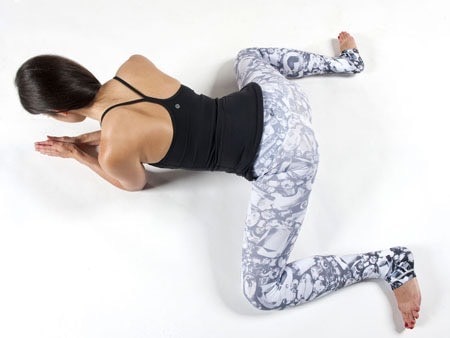
It takes some of the strain off of your arms because sometimes they feel like they’re falling asleep. Place the block underneath the chest, get yourself comfortable, and stay here. Eventually, you want to work on starting to slide the knees a little bit wider but still maintaining the hips right over the knees. That’s frog pose for you good to open up your hips and your inner thighs.
Rear Foot Elevated Quad Stretch
Another common stretch that people just get caught up in is an overly extended hip flexor stretch. It’s really targeting the superficial and deep hip flexors.
You can use a pad here, so you don’t kill the knees on the turf. Start in base setup position where everything is going to be hip-width apart here. Your toes are directly forward. Make sure that you’re at a ninety-degree position here. You are straight up and down at your femur, straight through the torso. In this position, you want to be cueing three different tension points.
The first one is going to be the glutes having tension. Squeezing the butt, especially on the backside here, stabilize a position the pelvis in neutral zone.
Next thing is a co-contraction coming from the pecs and the lats at the upper extremities and the shoulders. What that’s going to do is position the pillar from the bottom and the top. So we can have some better tension coming through the core.
The last one is going to be our centralized position. Add a little bit of oscillation to this movement, just to work in and out of the range. You can get the hands upright on the knees. Try to feel the tension here. You’re going to rock back and forth about an inch or two. Don’t do too much moving forward, because then you lose the tension that’s on the issues that you’re trying to target. Sit here for about 30 seconds or so.
Quad Foam Roll
Lay down foam roller on the ground and lie across it. Get down onto your arms and then roll the length of your quads. Use your elbows as support. Sart to roll gentle sweeping motions up and down the quads if this is quite soft start by just keeping both your legs onto the role. Change position by slowly rolling, so that your face towards your right and then slowly roll so that you face towards the left. This way you get the inner and outer quads.
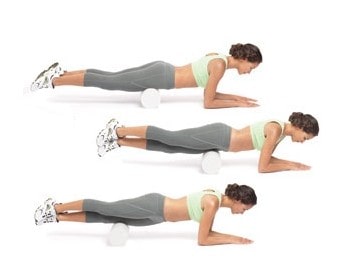
There are several ways to increase the intensity of this exercise.
a) You can kick your legs as you roll.
b) You can lean more on one side. You’ve got most of the weight through the left quad, and then you should switch to the other side. Also, you can place the other leg on top so that you’ve got extra weight on that quad. When you’re doing this, you might as well also focus more on the side of the leg, which is getting your vastus lateralis.
c) You can even firm roll the inside of your quads pretty merely.
Camel Pose
Come on up onto the shins. Knees hip distance, ankles hip distance. Hands-on your hips. Your thumbs close together by the spine. Ideally, if you’re not very flexible in the camel, you don’t have to bring the hands back. You could just go up and back, and keep the hands on the hips.
If you’re almost ready to put the hands down, then you would curl toes under, and you make the distance less. Easier to put the hands down. If you’re more flexible, you point the toes, and that’s where you’re going to start and build on. But if you need to, feel free to do any of these options.

You are going to go up as you go back. You don’t want to drop back like hinging one or two vertebrae here. Imagine there’s like a high jumping bar, and you have to go up and over to clear. So lift your heart, and then start to go back. Pause it right here. Take your hands back and down. You want to have the balance evenly, the weight on your arms and the legs. You don’t want the hips to have drifted back. The hips are scooping forward. The heart is reaching up. Shoulders are back and down.
Now, if you’re more flexible, you let the hands slide down, flat on the feet, toes are by the fingers without the hips drifting back. Push your heart up to the ceiling, shoulders back and down.
Think of you wants that whole smooth line of the spine. Be careful of everything here, and you crank the neck to feel more. That’s our full camel. When you get to the point when the hands are flat on the feet, this pose is kind of done. You’re not going to build it anymore, it’s going to get more open for you, but you are ready to go on to the pigeon at that point.
Straight Leg Raises
This exercise is very low-impact. There are many ways to strengthen your quadriceps, but this is an excellent way to get started, and if you’re advanced, this is still good way to exercise your quadriceps.
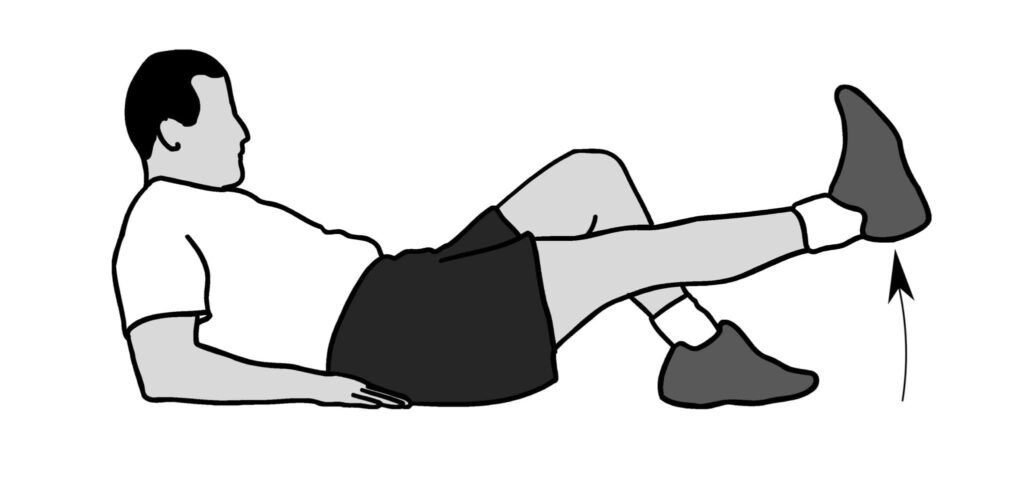
Have a seat. Very important to sit comfortably using your core, keeping your abs very tight as you sit upright. You’re going to straighten one leg out. You must flex your foot, squeeze that quadriceps muscle and keep it tight the whole time. That way you’re going to strengthen it properly. From there, go ahead and raise your leg and hold it for about two seconds. You’ll feel that burn. After that, bring it down, but don’t let it hit the ground. Your heel grazes the floor and then back up, squeezing that quadricep muscle. Now you can also do this exercise when the other leg straight both legs flexed and lifting it. If you do this way, you’re going to feel a little bit different strengthening as you lift it and hold that quadricep tight. It’s recommended to do that each leg about 15 reps, 3-4 sets. If it’s too easy for you add an ankle weight. It’s going to help strengthen that muscle even more.
Hamstring Curls
In this exercise, you will activate your pelvic floor and draw your waist in like an hourglass, and then you lengthen the tailbone down. You’re going to set the pelvis. It’s in more of a neutral position by elongating the lumbar spine down towards the heels and activating the glutes. Once you’ve got them engaged, then you want to imagine a resistance, so you almost want to imagine that you’re doing a leg press or leg curls at the gym.
You can wear ankle weights for this, but you don’t need to. As long as your body can imagine that there’s something heavy that the leg is having to pull up against, then the hamstring will engage. It’s like a bicep curl. This muscle works the same way. You’re curling the leg up, and you’re keeping the pelvis in neutral you’re feeling the hamstring really bulk up. Your resisting is allowing that muscle to lengthen. When you curl the leg, it is the concentric phase of the exercise. At this point, the muscles and fibers are concentrated and coming together. In the eccentric phase, you’re elongating them. In this way, you’re resisting both, so you’re creating work in both directions.
Lie down again. You’ll take a breath in, breathing into between the shoulder blades and allowing the whole back to open. Connect with your pelvic floor, draw the waist in, lengthen the tailbone down. Then activate the hamstring. Try and keep the calf and the foot relaxed. Try not to let your hips go from side to side and then inhale as you slowly go down. If you want to deepen this exercise, you can visualize your solace at the front of your body, pulling upwards and stretching away from its insertion point. It’s a much deeper feeling in the abdominals. Anyway, you don’t need to do that, as long as you’re activating your pelvic floor and your transversus while keeping your glutes on. It’s going to be quite an intense exercise.
Wall Squats
It is a simple exercise that you can do at home, gym, or even traveling. What you want to do, you’re going to have a wall, of course, and you’re going to lean down, put some pressure with your body, and then lean down until you come into a 90 degree. When you’re brand new, maybe a beginner at this, you won’t probably be able to go down this low, and that’s ok. The stronger you get, the lower you go. Just make sure you stop right here, about a 90 degree.
The Wall Squat is a great exercise to do, especially after squats and lunges. When you get in your wall squat, make sure your belly button is to the spine. It’s flat up against the wall. Your core is tight. You’re engaging your quads, hamstrings, glutes, hip flexors, and your core. You can also rest your hands. If you want to go more advanced, you can hold a medicine ball and just time yourself. Try to go 20 seconds, 30 seconds, up to a minute.
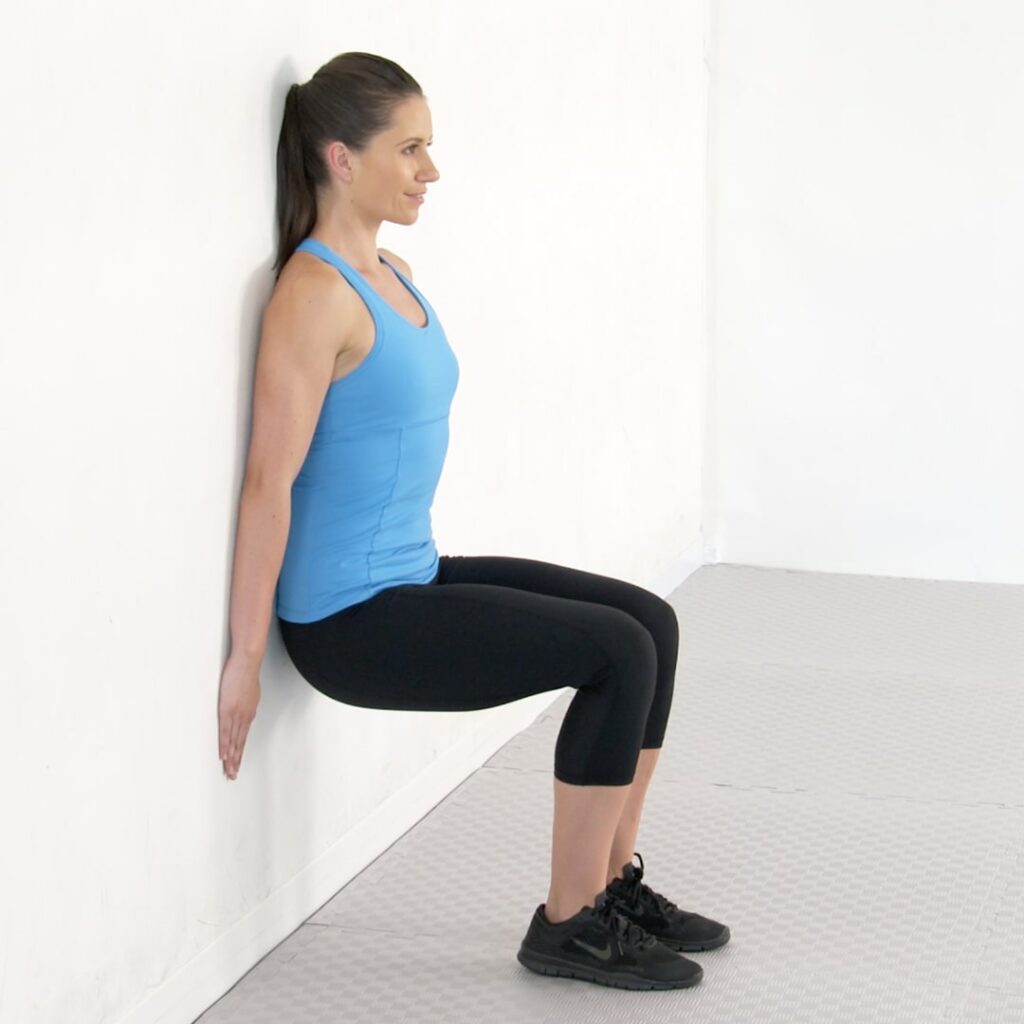
If you’re more advanced, you could bring your feet a little closer together, hands on the wall, lift a leg. Hold for how many seconds. Lift a leg. Hold another side, or you can just alternate — time yourself for alternation. Up, down, or have a ball. Bring it up, down. Those are about three variations of the wall squat.
Remember. Stretching your quads is an intense thing because we often sit in our culture. Sitting creates a lot of tension and shortness, which is the attack where the attachment is of the quad muscle. Stretching it out can be quite intense, especially if you’re not used to it. If you don’t do it often and if you’re sitting down all day as most of us are.

